EK1001 User Guide
Hardware Based User Guide
Download
Standard Functions
Reset to factory default settings: FN+ ESC
Backlight on/off: FN+ Scroll Lock
Windows/app key lock/unlock: FN+ Win

FN+F1 Media Player
FN+F2 Search
FN+F3 Favourites
FN+F4 Mute
FN+F5 Stop
FN+F6 Prev Track
FN+F7 Play/Pause
FN+F8 Next Track
FN+F9 Email
FN+F10 Browser
FN+F11 My Computer
FN+F12 Calculator
Light effect mode sequence - Press FN+INS to cycle between modes
1 - Rainbow Flow
Direction (L/R): FN+ ←/→
Speed (1-5): FN+ ↑/↓
2 - Uniform Colour Cycle
Speed (1-5): FN+ ↑/↓
3 - Raindrops
Colour: FN+ DEL
Speed (1-5): FN+ ↑/↓
4 - Keypress Waves
Colour: FN+ DEL
Speed (1-5): FN+ ↑/↓
5 - Rainbow Flow 2
Direction (L/R): FN+ ←/→
Speed (1-5): FN+ ↑/↓
6 - Vortex
Colour: FN+ DEL
Direction (L/R): FN+ ←/→
Speed (1-5): FN+ ↑/↓
7 - Uniform Static Colour
Colour: FN+ DEL
Speed (1-5): FN+ ↑/↓
8 - Breathing
Colour: FN+ DEL
Speed (1-5): FN+ ↑/↓
9 - Tennis
Colour: FN+ DEL
Speed (1-5): FN+ ↑/↓
10 - Light in the Dark
Colour: FN+ DEL
Speed (1-5): FN+ ↑/↓
11 - Twinkling Stars
Colour: FN+ DEL
Speed (1-5): FN+ ↑/↓
12 - Laser
Colour: FN+ DEL
Speed (1-5): FN+ ↑/↓
Preset Key Colours
There are 5 key colour presets, press FN+ 1-5 to load a key colour preset. To edit the presets, please see the section "Editing Preset Key Colours" for more information. Standard presets are listed below.
Standard Preset Key Colours:
FN+ 1: FPS - First Person Shooter Game. Keys highlighted: W A S D ↑ ↓ ← → ESC
FN+ 2: CF - Crossfire. Keys highlighted:
W A S D LCtrl LShift LAlt Space R G Q E B 1-5 Tab F1-F3 HM END PU PD PS
FN+ 3: COD - Call of Duty. Keys highlighted: Q W E R T A S D F G C V 1-7 LCtrl LShift
FN+ 4: LOL - League of Legends. Keys highlighted: Q W E R A S D F 1-7
FN+ 5: RACE - QQRace Racing. Keys highlighted: WASDR LCtrl LAlt LShift ↑ ↓ ← →
Editing Preset Key Colours
1. Press FN+ PrSc to enter recording mode.
2. The numbers 1-5 will flash red, which represents the different preset numbers. Press the key which represents the preset that you wish to edit.
3. Pressing keys on the keyboard will cycle their colours, the colour that the key is glowing will be the colour that is saved.
4. Press FN+ PrSc when finished, to save the settings.
5. To load your preset at a later time, press FN+ 1-5.
For example if you edited profile 3, then press FN+3 to load it.
Light Bar Settings
FN+ HM Wave, Neon, Static, Breathing
FN+ END Colour (1-7)
FN+ PU Brightness (1-5)
FN+ PD Speed (1-5)
FN+ Pause Wave Direction
FN+ APP Pause Wave
Movement
Software User Guide
Download
Click here to download the latest software.
Overview

1. Change visibility settings for the software.
2. Visit the Erasem website.
3. Close the software.
4. Reset the current profile to default settings.
5. Save settings.
6. Profiles: Click the profile you wish to use and/or edit.
7. Main option sections.
Main option sections
Key
In this section, you can assign functions to keys. To use this feature, please follow the instructions below:
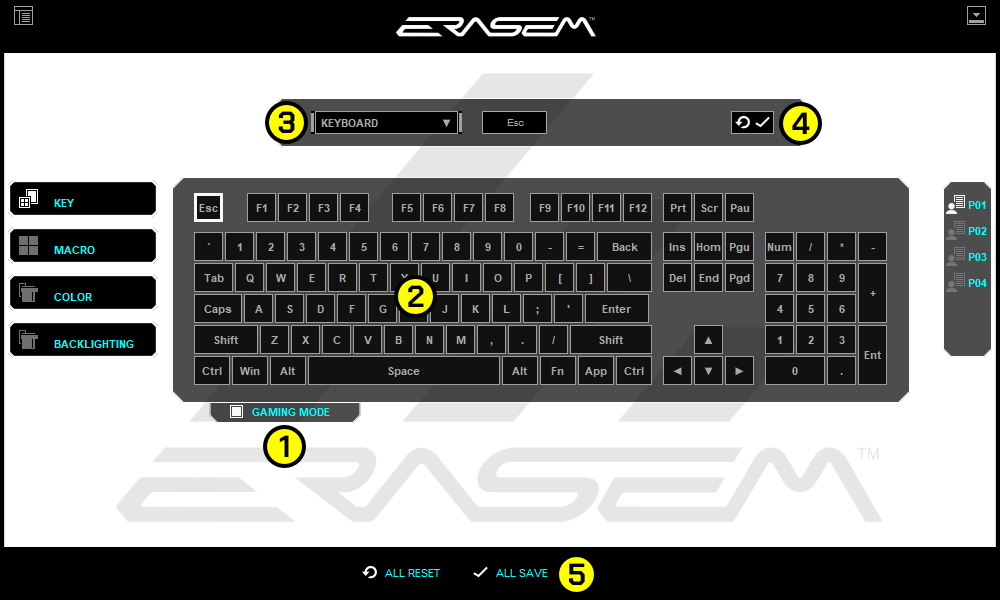
1. Tick the "Gaming Mode" box to enable editing.
2. Click on the key you would like to edit.
3. In the top menu, you have three choices:
Keyboard: Use this to disable keys.
Macro: Use this to assign a macro to a key. Tick the Endness box to have the macro peformed on both key press and release.
Media: Use this to assign a media function to a key.
4. When you have finished choosing your option for the key, press the tick button to confirm the changes, or press the circular arrow button to restore the default settings for the key.
5. Click the "All Save" button to save your changes.
Macro
In this section, you can create macros which you can assign to keys using the "Key" section described above. To use this feature, please follow the instructions below:
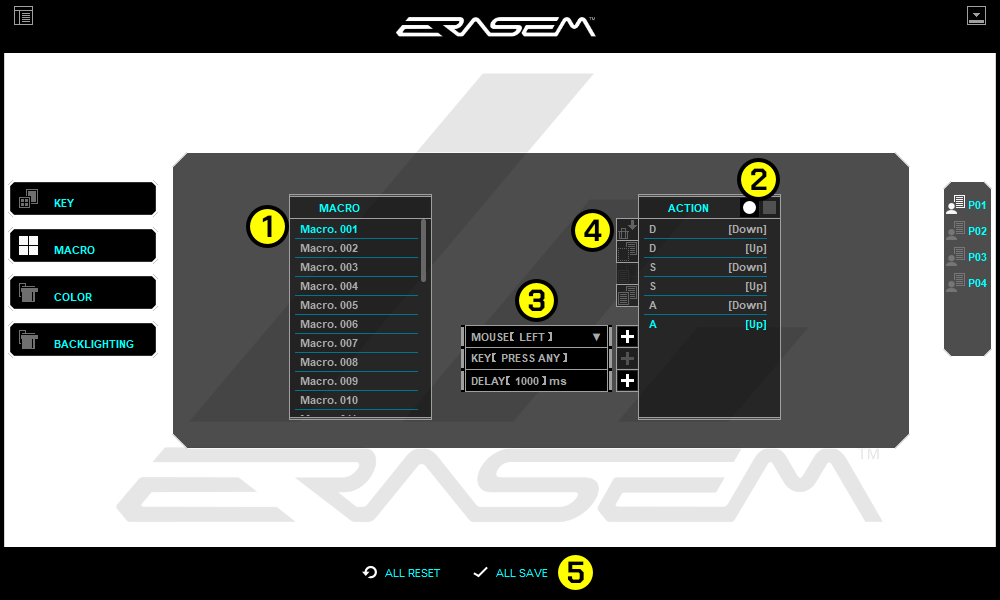
1. Click on the macro you wish to edit in the Macro box, Eg. "Macro.001".
2. You can record keys by pressing the record button at the top of the Action box. Press the stop button when you are finished.
3. in the central box, you can insert functions into your recording. You have three choices:
Mouse: Use this to insert a mouse click into the macro. Choose a button, then press the + button to insert it into your macro.
Key: Click this and then press the key you would like to insert, then press the + button to insert it into your macro.
Delay: Click this and then type in a number for the amount of milliseconds you would like the delay to last, then press the + button to insert it into your macro.
4. To Delete/Cut/Copy/Paste actions, first click on the action you wish to edit, and follow the below instructions:
Delete: Press the delete button to remove the action from the list.
Cut: Press the cut button to remove the action from the list, but able to be pasted elsewhere in the list.
Copy: Press the copy button to store the action in memory so that it can be duplicated by using the paste button.
Paste: After using the Cut or Copy button, the Paste button will become available. To paste above an action, click the action, then press the Paste button. To paste to the end of the action list, click in a blank area of the list and then press the paste button.
5. Click the "All Save" button to save your changes.
Color
In this section, you can apply colourful effects to the keys. To use this feature, please follow the instructions below:
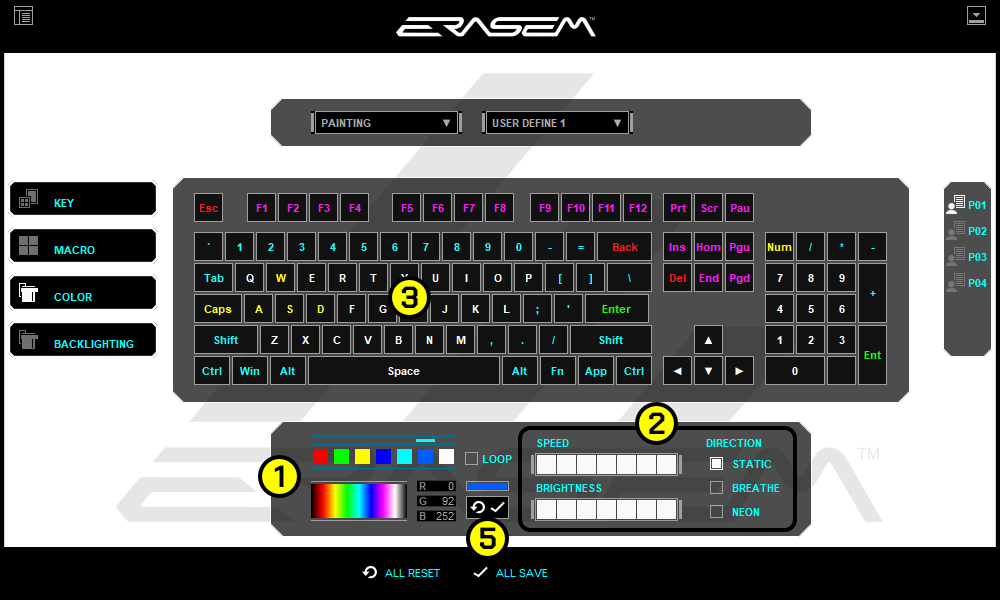
In the top menu, you have two choices:
Painting: This allows you to choose effects and colours for each individual key.
Effects: This will allow you to choose an effect in the options drop down menu to the right.
Effects: To choose an effect, click the left drop down menu, click on "Effects", then in the drop down menu on the right, click on "Options", then choose an effect from the list. The software will display a preview of the effect. If you are happy with your chosen effect, press the "All Save" button.
Painting: If you would prefer to choose your own colours for each key, click the left drop down menu and choose "Painting", then in the drop down menu on the right, click on "Options" and choose a profile from the list, Eg. "User Define 1".
To use the painting feature, first choose the colour settings, then click a key to apply those colour settings to the key. To use the colour settings, please follow the instructions below:
1. Choose a colour. There are seven preset colours available, which can be used as they are, or edited. To edit a colour:
A. Click the colour you wish to edit.
B. Click in the colour spectrum graphic to choose a colour. You can fine tune the colour by typing numbers in the R, G, B boxes (0-255).
2. (Optional) Adjust other settings.
Loop: Click this tickbox to create a custom rainbow effect with the colour presets you have chosen.
Brightness: Adjust the brightness of the key.
Speed: Adjust the speed of the breathing or neon effect.
Direction: Choose an effect for the key. The effects are:
Static: Plain colour with no other effects.
Breathe: The key brightness will cycle smoothly between your brightness setting and zero brightness, at the speed you have set using the speed adjustment option.
Neon: The key will cycle through the colours of the rainbow at the speed you have set using the speed adjustment option.
3. Click on the keys that you wish to apply the settings that you have chosen.
4. Repeat the process to create different settings for other keys.
5. Press the Tick button, then the "All Save" button.
If you would like to reset colour settings to default, press the circular arrow button. Warning: This will reset all user defined profiles in the colour section to default.
Backlighting
This section controls the colour effects of the light bar which runs around the edge of the keyboard. Please see below for a description of each section:
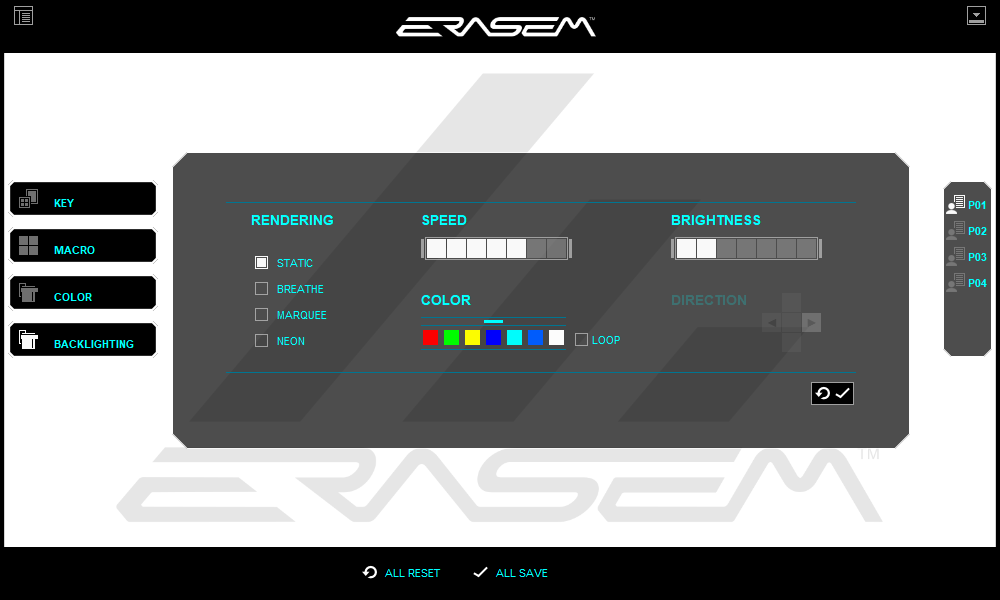
Rendering:
Static: Plain colour with no other effects.
Breathe: The brightness will cycle smoothly between your brightness setting and zero brightness, at the speed you have set using the speed adjustment option.
Marquee: An scrolling light effect which can be adusted for speed, brightness and direction.
Neon: The key will cycle through the colours of the rainbow at the speed you have set using the speed adjustment option.
Speed: The speed of the animation.
Brightness: The maximum brightness of the lighting.
Direction: This controls the direction of the Marquee setting.
Color: You can choose preset colours that have been created in the main Color section.
Loop: Click this tickbox to create a custom rainbow effect with the colour presets you have chosen.