EK801 User Guide
Hardware Based User Guide
Standard Functions
Reset to factory default settings: FN+ ESC
Backlight on/off: FN+ PS
Windows/app key lock/unlock: FN+ Win
FN+F1 Media Player
FN+F2 Volume -
FN+F3 Volume +
FN+F4 Mute
FN+F5 Prev Track
FN+F6 Play/Pause
FN+F7 Next Track
FN+F8 Stop
FN+F9 Email
FN+F10 Browser
FN+F11 My Computer
FN+F12 Calculator
Light effect mode sequence - Press FN+INS to cycle between modes
1 - Twinkling Stars
Number of stars: FN+ DEL
Speed (1-5): FN+ -/=
Brightness (1-5): FN+ ↑/↓
2 - Rainbow Keypress
Colour: FN+ DEL
Speed (1-5): FN+ -/=
Brightness (1-5): FN+ ↑/↓
3 - Ribbon
Breathing on/off: FN+ DEL
Speed (1-5): FN+ -/=
Brightness (1-5): FN+ ↑/↓
4 - Presets (see preset colour modes below)
Preset key colours: FN+ 1-5
Custom key colours: FN+ 6-0
Configure custom key colours:
Step 1. Choose custom profile. eg: FN+ 7
Step 2. Press FN+ HM
Step 3. Press desired keys to cycle through colours
Step 4. Press FN+ HM to save
Clear custom key colours:
Step 1. Choose custom profile. eg: FN+ 7
Step 2. Press FN+ HM twice
5 - Rainbow Flow
Direction (left/right): FN+ ←/→
Speed (1-5): FN+ -/=
Brightness (1-5): FN+ ↑/↓
6 - Light in the Dark
Colour: FN+ DEL
Speed (1-5): FN+ -/=
Brightness (1-5): FN+ ↑/↓
7 - Sine Wave
Colour: FN+ DEL
Speed (1-5): FN+ -/=
Brightness (1-5): FN+ ↑/↓
8 - Uniform Colour
Colour: FN+ DEL
Brightness (1-5): FN+ ↑/↓
9 - Breathing
Colour: FN+ DEL
Speed (1-5): FN+ -/=
Brightness (1-5): FN+ ↑/↓
10 - Uniform Colour Cycle
Speed (1-5): FN+ -/=
Brightness (1-5): FN+ ↑/↓
11 - Shooting Stars
Colour: FN+ DEL
Speed (1-5): FN+ -/=
Brightness (1-5): FN+ ↑/↓
12 - Raindrops
Colour: FN+ DEL
Speed (1-5): FN+ -/=
Brightness (1-5): FN+ ↑/↓
13 - Rainbow Roulette
Speed (1-5): FN+ -/=
Brightness (1-5): FN+ ↑/↓
14 - Keypress Waves
Colour: FN+ DEL
Speed (1-5): FN+ -/=
Brightness (1-5): FN+ ↑/↓
Preset Colour Modes:
FN+ 1: FPS - First Person Shooter Game. Keys highlighted: W A S D ↑ ↓ ← → ESC
FN+ 2: CF - Crossfire. Keys highlighted:
W A S D LCtrl LShift LAlt Space R G Q E B 1-5 Tab F1-F3 HM END PU PD PS
FN+ 3: COD - Call of Duty. Keys highlighted: Q W E R T A S D F G C V 1-7 LCtrl LShift
FN+ 4: LOL - League of Legends. Keys highlighted: Q W E R A S D F 1-7
FN+ 5: RACE - QQRace Racing. Keys highlighted: WASDR LCtrl LAlt LShift ↑ ↓ ← →
Software User Guide
Click here to download the latest software.
Overview
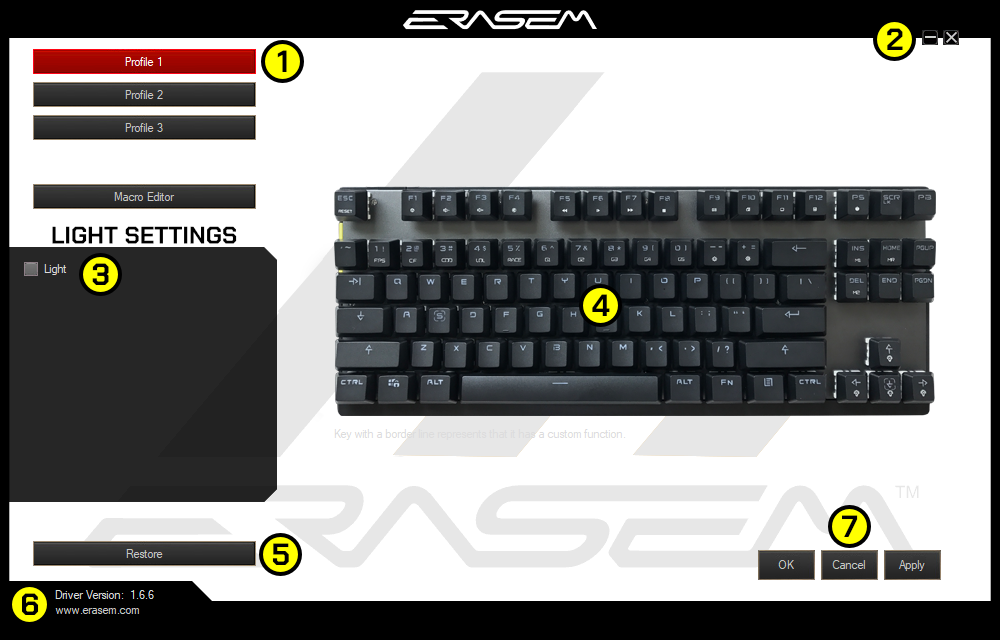
1. Profiles: Click the profile you wish to use and/or edit.
2. Minimise or close the software.
3. Checkbox to enable the light editing menu.
4. Key configuration area.
5. Restore profile to factory default settings.
6. Driver version. Click the web address to visit the Erasem website.
7. Ok: Save settings and close. Cancel: Discard changes. Apply: Save settings.
Main option sections
Keys
In this section, you can assign functions to keys.
Begin by clicking the key (in the keyboard picture) that you wish to change the function of. The following window will appear:
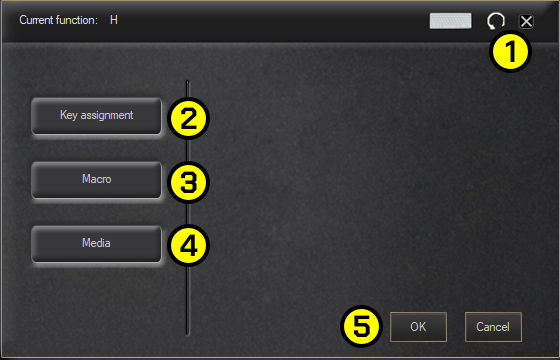
This window has the following functions:
1. Reset key to default settings, or close the window.
2. Key assignment: Click this button, then press the key on the keyboard that you would like to assign to the key.
3. Macro: Click this button, then choose a macro from the list. To create a macro which will appear in this list, please see the "Macros" section of this guide.
4. Media: Click this button, then choose a media function from the list.
5. Click OK to save changes and close the window, or click Cancel to discard the changes and close the window.
Macros
In this section, you can create macros. To use this feature, please follow the instructions below:
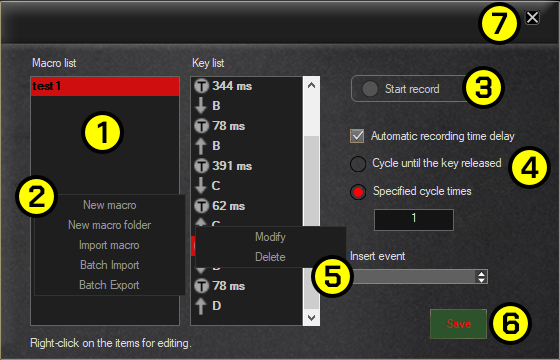
1. Right click in the macro list to bring up a menu. The below is a list of all possible options in this menu:
New Macro: Create a new macro.
New Macro Folder: Create a new macro folder. This can be used to group similar macros for easier organisation.
Import Macro: Import a macro from a file.
Batch Import: Import multiple macros from files.
Batch Export: Export macros to files.
Export: (when right clicking a macro) Export this macro.
Rename: (when right clicking a macro or folder) Rename the macro or folder.
Delete: (when right clicking a macro or folder) Delete this macro or folder. Note: If you delete the folder, all macros contained within it will also be deleted.
2. To create a macro, use the right click menu in the macro list to select the "New Macro" or "New Macro Folder" option. If you will require a folder, it is better to do that first, and then create the macro inside it. A window will appear where you can enter the name for the macro or macro folder - enter the name, then press OK to create it.
3. With your macro selected, press the "Start Record" button to record keystrokes. Press keys on the keyboard to record keystrokes. Once you have finished recording, click the same button which will now be named "Stop Record".
4. There are a number of options which will change how the macro records, and behaves:
Automatic recording time delay: Tick this box to automatically record the time delay between keystrokes. The time delays can be edited once they are recorded.
Cycle behaviour: The macro can either cycle a set amount of times (eg. once), or for as long as you hold the key down.
5. Editing and/or inserting events:
Edit an event: To edit an event, right click on the event in the Key List, this will bring up a menu where you can either delete the event, or modify it.
Insert an event: You can insert a custom event by using the drop down menu titled "Insert event". The event will be inserted at the end of the list, unless you have an event selected - in which case, the event will be inserted above the selected event. The options are:
Key Down: Insert a "Key Down" event. This is the same as when you press a key down.
Key Up: Insert a "Key Up" event. This is the same as when you release a key.
Delay: Insert a delay between events. Enter the time in milliseconds that you would like the delay to last for.
Left/Right/Middle Button: Insert a mouse click from either the left, right, or middle mouse buttons.
6. Click the Save button to save the macro.
7. Once you are finished using the macro function, press the X button to close the window.
Colours
In this section, you can apply colourful effects to the keys. To use this feature, please follow the instructions below:

1. Click the tickbox to enable the light settings.
2. Choose an effect from the drop down menu. Please see the hardware based user guide for a description of the effects. If you do not choose "Game Mode", you can skip to step 7.
3. If you choose Game Mode, then you can define the colour of each key. Choose the colour group that you would like to save settings to.
4. Basic Colour: This colour is the colour of all keys that don't have their own individual colour. This setting will overide all key colours, so it's best to set it first.
5. Colour: This colour is the individual key colour.
6. Once you have chosen an individual key colour, click the keys on the picture of they keyboard to apply the colour to the keys. Repeat this process to colour as many different keys as you need.
7. When you have finished, click the "Apply" button in the bottom right of the software. If you wish to change key settings (macros, key assignments, etc.), untick the "Light" tickbox to close the lighting options.